My family loves sausages. My son prefers them with fried brussel sprouts or asparagus or with some rice. I am not always able to source the decent ones without wheat and other unnecessary ingredients so I came up with the simple recipe of my own.
This recipe is based on the traditional Russian meat patties (kotleti) and has absolutely no wheat! I do add some liver into my sausages so it is an excellent way to include liver into your family's diet if some of the members don't favour it in any other form like my son.
As you probably know, organic pastured liver is an excellent source of vitamins A, B and C, folic acid, iron and many more vital nutrients, more information on that is here.
I also add some lard, it makes the sausages fluffier, and is also an excellent source of vitamin D, more information on that here.
I eventually stopped buying sausages and started making my own. I prepare a batch and freeze it. When I need to use sausages I just thaw some on the kitchen counter or covered in the fridge overnight or if I am in a hurry in the oven-proof shallow dish in the oven.
I also use this same recipe for making meatballs and burger meat, I just freeze the meat in around 100 g balls on the plastic lid covered with cling film and then transfer to a zippy bag and keep in the freezer.
This recipe is calling for experimenting, so if you and your family have some favourite spices that you think will go well, then please do add them and share the results in the comments.
Ingredients:
250 g organic grass-fed beef/wild venison mince
250 g organic pastured pork mince
1-2 organic pastured chicken liver/s
(I use the ones that come inside the chicken carcasses I buy for the bone broth, the liver inside usually comes with a chicken heart, so I throw that in too)
1-2 tbsp organic pastured lard
2 stalks of organic parsley with leaves (and/or any other spices you like) - optional
1 small organic onion
2 cloves of garlic
1 small organic potato (optional)
unrefined sea salt
freshly ground organic black pepper
Equipment:
food processor (optional)
cling film
Instructions:
If you are using the food processor, pulse together onion, garlic, peeled potato, parsley and liver almost to the liquid consistency. If you are not using the food processor cut each ingredient mentioned in the above sentence very fine, as fine as you can.
Combine all the ingredients in a fairly large bowl, season with salt and pepper and add any other seasoning you like. Now you need to 'beat' the meat 'dough': pick it up with one hand and drop it back into the bowl and so on for 3-5 minutes. This will bind the meat quite well, this is what my mum always used to do.
Cover the bowl with cling film and leave to season for 2 - 6 hours. I leave mine overnight in a cool place. If you are seasoning your meat for 2 hours only then you can do that at room temperature, if longer first 2 hours at room temperature and the rest of the time at cooler temperature (like pantry) or in the fridge.
When ready to make the sausages take a spare cutting board or rectangular plastic lead from one of the food containers or something similar and cover it with cling film leaving as much extra cling film on the sides as necessary to cover the sausages later. Scoop half of the meat and place it on top of the cling film. Using wet spatula or bench scraper shape the meat into about 2 cm thick rectangle, helping yourself with the cling film edges as well as the fork, see what works best for you.
Using wet spatula or bench scraper again divide the meat rectangle into separate sausages, leaving space between them, like this
try to do it more evenly than I did it :)
Cover the sausages with the cling film, folding the sides and covering it completely. Place the tray with sausages into the freezer. Repeat the process till all the meat is made into sausages. I usually leave mine in the freezer overnight or for 24 hours. The sausages need to harden so you can uncover them and transfer them into a plastic zip bag and store them in the freezer until you need them.
When I am ready to cook the sausages I thaw them on the counter at room temperature or if I am short for time in an oven proof dish in the oven. I then fry them and serve.
Hope you like the recipe and will share your experience in the comments below!
This post is linked to Gluten Free Wednesdays, Kelly The Kitchen Kop's Real Food Wednesdays and Food Renegad's Fight Back Friday blogs' carnivals.
Here I share my recipes inspired by WAPF diet, based on real food, and adopted from different sources.
Showing posts with label Meat. Show all posts
11 January 2014
8 August 2013
Sourdough Pelmeni (Russian Meat Dumplings)
This is a very traditional Russian recipe and does require time to prepare, but once ready it is a very nutritional, healthy, fast and easy to prepare meal. Please read through to make sure you set aside enough time to prepare this recipe.
Ingredients:
For the dough
100 g white active sourdough starter
100 g filtered water
3 organic free range eggs
1 tsp sea salt
500 g organic white all purpose flour
For the meat filling
350 g organic pastured pork mince
350 g organic pastured beef mince (or wild venison mince if available)
50 g organic pastured chicken liver
50 g organic pastured lard or beef tallow or butter
1 small organic onion
2 medium cloves of organic garlic
salt and pepper to taste
Equipment:
mixing bowl
cling film
rolling pin
Russian pelmeni maker (they sell it on ebay)
Instructions:
Mix all the ingredients for the dough and knead it very well for around 10 minutes. The dough should be quite stiff. Place the dough in a slightly floured bowl and cover with cling film. Leave the dough at room temperature for at least 8 hours or overnight.
After 8 hours or in the morning prepare the meat filling by blending together all the liver, fat, onion, garlic and spices. Add this mixture into the pork and beef (venison) mince and mix it thoroughly with your hands if possible, beat it by lifting the meat mixture and slamming it back in the mixing bowl, do that for at least 5 minutes. The fat and liver in the mixture makes the filling soft and fluffy, and the beating makes it bind together better. After you done, cover the bowl with the meat with cling film and let it 'rest' for 10 minutes.
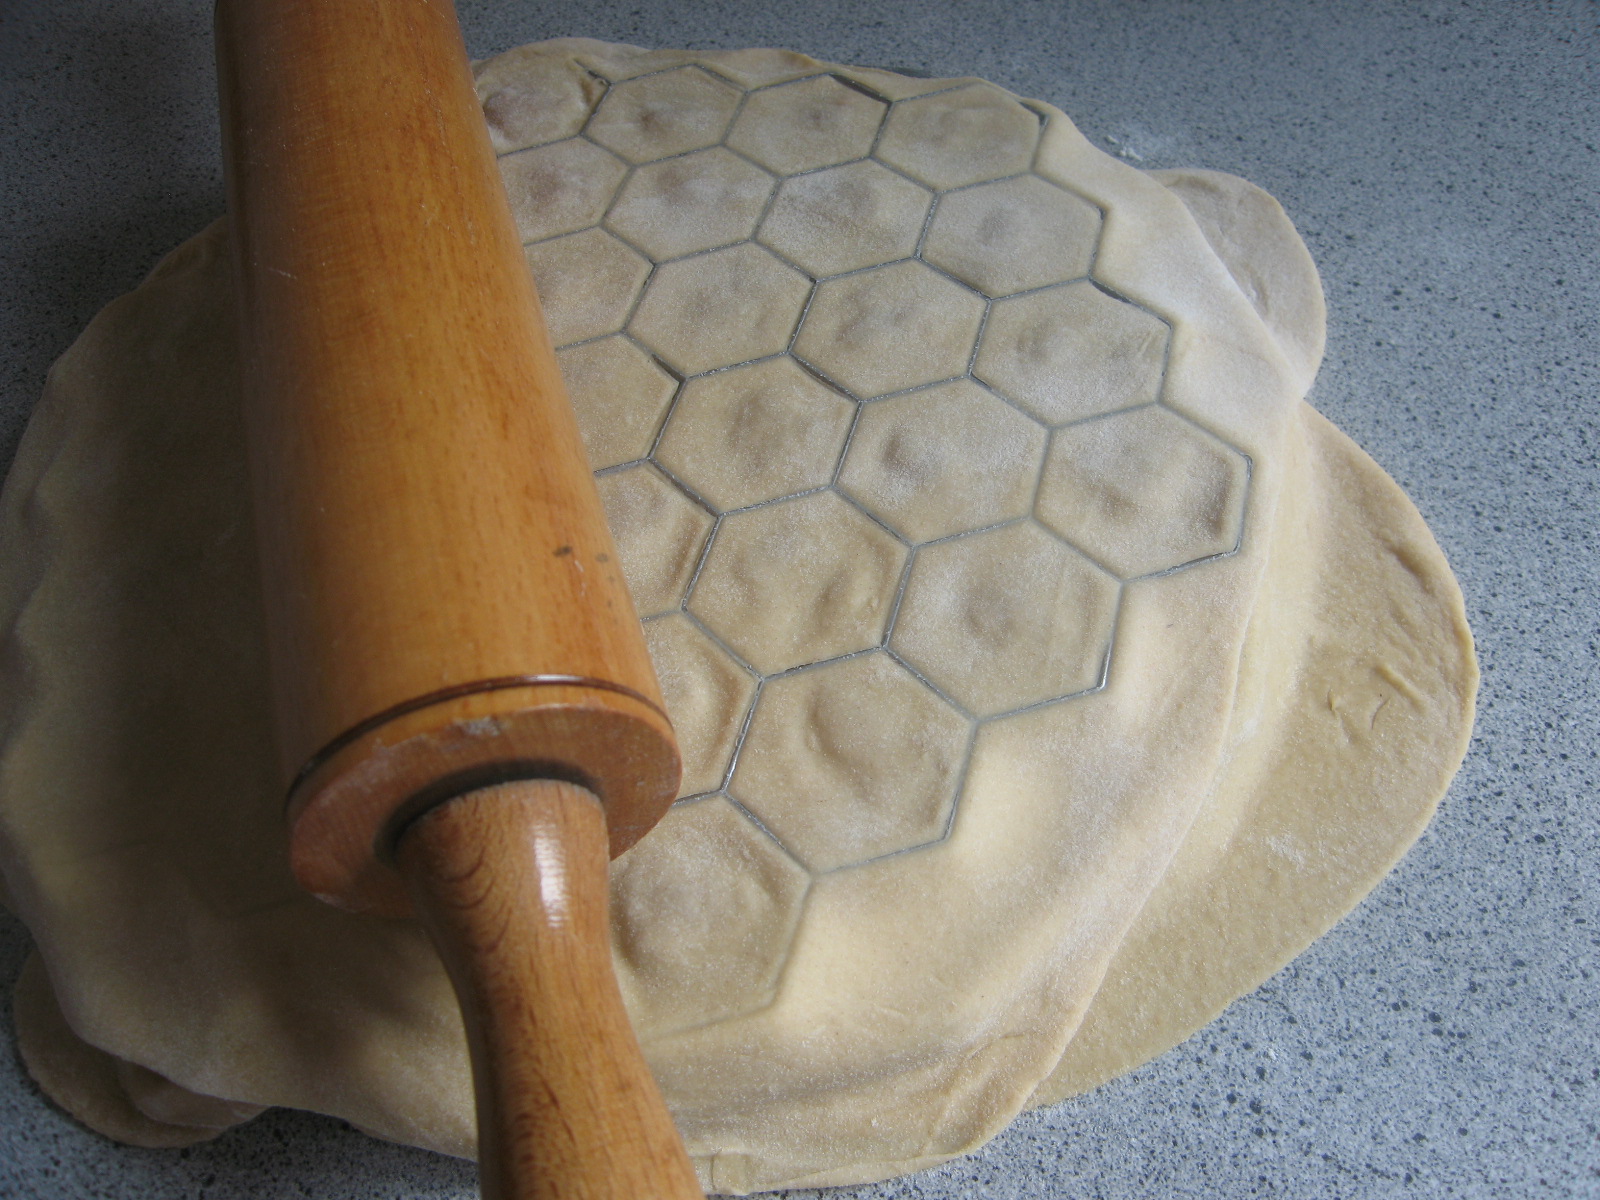
In the meantime take the dough, nip off a small fist-size ball and roll it out very thinly on a lightly floured surface, leave the rest of the dough covered with cling film. Take the pelmeni maker and sprinkle it with some flour so the dough doesn't stick to it,
place the rolled out dough on top of the pelmeni maker.
Now you need to fill every opening with the meat mixture that you prepared earlier. Take two tea spoons and scoop the meat with one, there should be about 1/2 of the tsp of meat or slightly more, do not be tempted to take more meat as the finished product might burst, manipulating the piece of meat with two tea spoons scoop it out into first opening. Proceed filling in every opening of the pelmeni maker.
Do it as evenly as you can, some balls of meat will be bigger some smaller, that is ok.
Next cut another fist-size ball from the dough, roll it out thinly and place it over the meat.
Take the rolling pin and very gently bash on the top layer of dough so that the meat balls sink inside and then roll it on top to separate the pelmeni.
Remove the extra dough from around,
pick up the pelmeni maker by the edge, turn it upside down and bash its side on the table so that the pelmeni fall out
be careful not to squash already fallen out pelmeni. Now for easier storage you need to freeze them. The best way to do it is by placing ready pelmeni on the slightly floured flat surface, I use plastic leads,
cover them with some cling film and transfer to the fridge for a few hours or until the pelmeni are frozen hard, then you can transfer them all into a large plastic zip bag and place into the freezer for the storage.
Keep doing the same using all the dough and all the meat.
At the very end when you have a small mount of both meat and dough I would advise you to finish off without the pelmeni maker. Here is how. Roll out the remaining dough thinly, take a narrow glass about 6-7cm in diameter and use it to cut the circle of dough,
then place the same ball of meat as above in the middle of the circle, take the circle in your hand bring the edges of the dough together to form a semi-circle and pinch the edges with your fingers, then bring the opposite ends together and form a round pelmen by pinching the ends together firmly.
You can actually make the whole batch like that manually if you decide to be really traditional about it.
In case you have some leftovers of meat and no more dough you can form meat balls and freeze them. If you have leftovers of dough you can roll it out very thinly, cut out long strips with a pizza cutter and you have tagliatelle pasta.
As soon as you make the pelmeni you can cook them straight away. You need to boil some water in a pot, adding 2-3 peppercorns, 1 bay leaf and some sea salt.
When the water is boiling throw in the amount of pelmeni you intend to eat, do not cover with the lid. Fresh pelmeni need 1-2 minutes to cook in the boiling water, they will be floating on the surface. When ready fish the pelmeni out with a skimmer, place them in a bowl and eat straight away. But if you really want to be Russian about it, add some sour cream (you can make your own, here is the recipe), a tea spoon of horseradish sauce and some of the liquid, mix everything together and eat as a soup.
The frozen pelmeni can be eated the same way, you do not need to thaw them, just boil the water and put the frozen pelmeni straight in, they will take 2-3 minutes in the boiling water to be cooked.
Pelmeni keep in the freezer for a few months and are really tasty and nourishing alternative to fast food or whenever you have no time for cooking.
Ingredients:
For the dough
100 g white active sourdough starter
100 g filtered water
3 organic free range eggs
1 tsp sea salt
500 g organic white all purpose flour
For the meat filling
350 g organic pastured pork mince
350 g organic pastured beef mince (or wild venison mince if available)
50 g organic pastured chicken liver
50 g organic pastured lard or beef tallow or butter
1 small organic onion
2 medium cloves of organic garlic
salt and pepper to taste
Equipment:
mixing bowl
cling film
rolling pin
Russian pelmeni maker (they sell it on ebay)
Instructions:
Mix all the ingredients for the dough and knead it very well for around 10 minutes. The dough should be quite stiff. Place the dough in a slightly floured bowl and cover with cling film. Leave the dough at room temperature for at least 8 hours or overnight.
After 8 hours or in the morning prepare the meat filling by blending together all the liver, fat, onion, garlic and spices. Add this mixture into the pork and beef (venison) mince and mix it thoroughly with your hands if possible, beat it by lifting the meat mixture and slamming it back in the mixing bowl, do that for at least 5 minutes. The fat and liver in the mixture makes the filling soft and fluffy, and the beating makes it bind together better. After you done, cover the bowl with the meat with cling film and let it 'rest' for 10 minutes.
In the meantime take the dough, nip off a small fist-size ball and roll it out very thinly on a lightly floured surface, leave the rest of the dough covered with cling film. Take the pelmeni maker and sprinkle it with some flour so the dough doesn't stick to it,
place the rolled out dough on top of the pelmeni maker.
Now you need to fill every opening with the meat mixture that you prepared earlier. Take two tea spoons and scoop the meat with one, there should be about 1/2 of the tsp of meat or slightly more, do not be tempted to take more meat as the finished product might burst, manipulating the piece of meat with two tea spoons scoop it out into first opening. Proceed filling in every opening of the pelmeni maker.
Do it as evenly as you can, some balls of meat will be bigger some smaller, that is ok.
Next cut another fist-size ball from the dough, roll it out thinly and place it over the meat.
Take the rolling pin and very gently bash on the top layer of dough so that the meat balls sink inside and then roll it on top to separate the pelmeni.
Remove the extra dough from around,
pick up the pelmeni maker by the edge, turn it upside down and bash its side on the table so that the pelmeni fall out
be careful not to squash already fallen out pelmeni. Now for easier storage you need to freeze them. The best way to do it is by placing ready pelmeni on the slightly floured flat surface, I use plastic leads,
cover them with some cling film and transfer to the fridge for a few hours or until the pelmeni are frozen hard, then you can transfer them all into a large plastic zip bag and place into the freezer for the storage.
Keep doing the same using all the dough and all the meat.
At the very end when you have a small mount of both meat and dough I would advise you to finish off without the pelmeni maker. Here is how. Roll out the remaining dough thinly, take a narrow glass about 6-7cm in diameter and use it to cut the circle of dough,
then place the same ball of meat as above in the middle of the circle, take the circle in your hand bring the edges of the dough together to form a semi-circle and pinch the edges with your fingers, then bring the opposite ends together and form a round pelmen by pinching the ends together firmly.
You can actually make the whole batch like that manually if you decide to be really traditional about it.
In case you have some leftovers of meat and no more dough you can form meat balls and freeze them. If you have leftovers of dough you can roll it out very thinly, cut out long strips with a pizza cutter and you have tagliatelle pasta.
As soon as you make the pelmeni you can cook them straight away. You need to boil some water in a pot, adding 2-3 peppercorns, 1 bay leaf and some sea salt.
When the water is boiling throw in the amount of pelmeni you intend to eat, do not cover with the lid. Fresh pelmeni need 1-2 minutes to cook in the boiling water, they will be floating on the surface. When ready fish the pelmeni out with a skimmer, place them in a bowl and eat straight away. But if you really want to be Russian about it, add some sour cream (you can make your own, here is the recipe), a tea spoon of horseradish sauce and some of the liquid, mix everything together and eat as a soup.
The frozen pelmeni can be eated the same way, you do not need to thaw them, just boil the water and put the frozen pelmeni straight in, they will take 2-3 minutes in the boiling water to be cooked.
Pelmeni keep in the freezer for a few months and are really tasty and nourishing alternative to fast food or whenever you have no time for cooking.
25 September 2011
Perfect Luncheon Meat
After starting the WAPF diet I stopped buying luncheon meat at the supermarket and realised that I seriously miss it with the sourdough bread for occasional sandwich and eventually came up with a few solutions that serve me really well. I usually have boiled beef heart, or boiled beef tongue, or cooked pork belly. While boiled heart and tongue do not require any receipt, you just boil them with salt, bay leaves, black peppers, carrot, onion and celery until ready, the cooked pork belly is a different story and requires a bit more preparation and so I decided to share it here.
Ingredients:
For seasoning:
1-1.5 kg grass fed organic pork belly off the bone
coarse sea salt (to taste)
crushed black pepper (to taste)
2-3 gloves of organic garlic
fresh or dried organic thyme (to taste)
1-2 cm organic ginger root
1 medium organic onion
2 spring organic onions (optional)
1/2 organic sweet pepper of any color (optional)
2 tsp raw organic honey
For actual cooking:
2-3 organic bay leaves
1 medium organic carrot
1/2 organic onion
1 organic celery stick
6-10 black peppercorns
string for tying up
large pot
When your meat is ready take it out of the pan and put it in a large bowl or a small roasting tin, wherever it fits, put a cutting board on top, press on it so it becomes a bit flattened and then place something heavy on top.
I usually use a couple of heavy cooking books.
Subscribe to:
Posts (Atom)