This is an easy to cook and very seasonal dish that is amazingly rich and nourishing. All the ingredients I use here are organic.
Ingredients:
1 medium pumpkin
2 large carrots
2 medium onions
2-3 garlic cloves
100 g butter (I use 1/2 a block or sometimes more)
small bunch of green onions (optional)
small bunch of parsley (optional)
50 - 100 g double cream
1 1/2 - 2 litres chicken stock (warm or hot)
sea salt and ground black pepper (to taste)
Equipment:
Hand blender
Instructions:
Clean the pumpkin using the potato peeler, or any other way you prefer. Cut it in small cubes and set it aside. Finely chop onions and garlic and sauté them slightly in a heavy-bottomed cast iron skillet with a generous blob of butter. Peel and grate the carrots and place them together with the onions and garlic, add roughly chopped green onion if using and pumpkin cubes, cover with a lid and cook until the pumpkin is very soft. At the end add some salt and pepper and the last chuck in some chopped parsley, if using. Leave it with the closed lid for a minute or 2 and turn off the gas.
Place all the ingredients from the skillet into approximately 3 litre pan, add half of the chicken stock, the rest of the butter, 50 g of the double cream and using hand blender blend the mixture till it reach the consistency that you like. Try it and see if you need to adjust salt and pepper; see if it is liquid enough for your taste, if not add some more stock and/or cream and blend a bit more or just mix everything with a big spoon. Taste again to see that you are happy with the result.
It is very good on a cold autumn day with a spoon of sour-cream and some croutons or just on its own.
Please enjoy!
25 October 2013
17 September 2013
Sourdough Flatbreads
This recipe is very tasty to have for breakfast with your favourite dip, salsa or chutney; it is good with meats or sausages, salad or sautéed vegetables or just with some butter and cheese. These flatbreads are absolutely fantastic to cook on the barbecue grill along with the meats and vegetables. They are best to eat while warm.

Ingredients:
200 g (under 1 US cup) plain organic yoghurt (I used here raw unpasteurised)
100 g (under 1/2 US cup) active white sourdough starter (here is the recipe)
300 g (1 1/4 US cup) organic white all purpose unbleached flour
1 tsp unrefined sea salt
1 tbsp raw organic honey (optional)
Organic rice flour for dusting
Equipment:
Mixing bowl
Cling film
Rolling pin
Cast iron grill pan (or regular cast iron pan, or barbecue frill)
Instructions:
Mix together yoghurt, starter, flour and salt, knead for a few minutes. If you or your child do not enjoy the sourness too much just add honey to cover that up, you might want to add a bit more flour. The dough should be soft and just slightly sticky. Transfer the dough into lightly floured bowl, cover with cling film and leave to ferment for 8 hours or overnight. I usually mix the dough in the evening and ferment it overnight so we can have the breads for breakfast. I left it out longer and used one half for breakfast the next morning and the rest (resting covered at room temperature) for breakfast the day after and it was still very yummy.
When ready heat the cast iron grill pan and divide the fermented dough into 8 balls. Dust the counter with some rice flour and roll out one of the balls into a flat circle around 2 mm (1/8") thick, make sure it is smaller in diameter then your grill pan if you have a small one like I do. Transfer the dough circle straight into the hot grill pan. Grill each side for around 1 minute or until ready.

Your grill pan should be really hot and not oiled. Transfer the flatbread straight into a plate to eat right away or a kitchen towel lined bread basket or shallow bowl and cover it with another kitchen towel to keep it soft. Repeat with the rest of the flatbreads and keep them covered with tea towel.

The flatbreads keep well covered with a kitchen towel for about an hour, for longer storage transfer them into the plastic bag, reheat on the grill.
This recipe is my new e-book Sourdough Goodness. If you want to get the book please email me at annadroz@gmail.com
Traditional Recipes Collection is HERE!!!
This post contains affiliate links and if you purchase something I get a commission. Thank you for your support of this site!

Are you new to real food and wish you had more healthy recipes…including snacks and money-saving ideas? When someone asks, “What’s for dinner?” do you have an answer? Is it “the same old?” The Traditional Recipes Collection is here to help. With 17 books, over 800 recipes and ideas, worth over $150 for just $14.97, this collection is an amazing deal. It’s available for 5 days only, from Tuesday, Sept. 17 through 11:59 PM (EST) on Saturday, Sept. 21. There will be no late sales. Please see the fine print at the bottom for all sale details. With one simple purchase, you can get access to 17 different books from prominent and up-and-coming real food bloggers. There are books to teach you how to include more healthy ingredients, how to save time, how to save money, how to create food that goes with you, how to make desserts and holiday dishes, and so much more. View the FAQ.

I really enjoy cooking and baking and I am always looking for new ideas for healthy recipes so when I saw this collection of books I got really excited, it had everything I needed. This e-book collection is smaller and cheaper than a lot of the ones that I have seen coming through recently. It’s very niche-specific, only traditional food recipes and mostly books that have not been in any of the recent bundles.
It contains over 800 healthy real food recipes, including snacks for the whole family, yummy deserts, main dishes and sides, condiments, smoothies, as well as meal plans, formulas on designing your own healthy dishes with the available ingredients, information on kitchen tools, techniques, pantry staples, meal planning, and so much more. This is really something not to be missed!
Are you new to real food and wish you had more healthy recipes…including snacks and money-saving ideas? When someone asks, “What’s for dinner?” do you have an answer? Is it “the same old?” The Traditional Recipes Collection is here to help. With 17 books, over 800 recipes and ideas, worth over $150 for just $14.97, this collection is an amazing deal. It’s available for 5 days only, from Tuesday, Sept. 17 through 11:59 PM (EST) on Saturday, Sept. 21. There will be no late sales. Please see the fine print at the bottom for all sale details. With one simple purchase, you can get access to 17 different books from prominent and up-and-coming real food bloggers. There are books to teach you how to include more healthy ingredients, how to save time, how to save money, how to create food that goes with you, how to make desserts and holiday dishes, and so much more. View the FAQ.
Books
Kitchen Help

- Cooking With Coconut Oil by Jennifer Saleem of Hybrid Rasta Mama
- Design a Dish by Millie Copper of Real Food for Less Money
- Restocking the Pantry by Kresha Faber of Nourishing Joy
- Real Food, Real Easy by Angela Montgomery of Real Whole Health
- Real Food for Real Homemakers by Jami Balmet of Young Wife’s Guide, Jaimie Ramsey of Living In the Light and Elsie Callender of Richly Rooted
Main Dishes

- 7 Day Real Food Meal Plan by Roxanne King of The Holistic Mama
- Much Ado About Chicken by Debra Worth of Sweet Kisses and Dirty Dishes
- Stretchy Beans by KerryAnn Foster of Intentionally Domestic
- Divine Dinners by Lydia Joy Shatney of Divine Health From the Inside Out (92 gourmet dinners, sides, soups, and more, GF)
Snacks and Sides

- The Veggie Book by Danielle Tate of More Than Four Walls, Sara Shay of Your Thriving Family and Debra Worth of Sweet Kisses and Dirty Dishes
- Healthy Snacks to Go by Katie Kimball of Kitchen Stewardship
- Steeped by Katie Stanley of Nourishing Simplicity
- Toadally Primal Smoothies by Primal Toad of Primal Toad
Desserts, Baking and Special Occasions
- Festive Traditions by Jill Marks of Modern Alternative Kitchen
- Treat Yourself: Real Food Desserts by Kate Tietje of Modern Alternative Mama
- Sourdough Goodness by Anna Drozdova of Thought For Real Food
- Travel Foods by KerryAnn Foster of Intentionally Domestic
Bonus Offers
 |
15% off Real Salt orders. Get healthy, unrefined sea salt delivered to your kitchen. |
| 5% off Wise Choice Market orders over $50. Pick up mineral-rich stock, soaked nut butters and cereals, or even potato chips made with coconut oil. | |
 |
Simple Natural Health by Nina Nelson of Shalom Mama. Keep your family healthy this winter not only with food, but with homemade remedies. |
 |
One month FREE premium membership to Tradishen. Your premier 100% real food recipe and meal planning site. |
 |
$25 off Dietician Cassie one year package -- Get some help with personal nutrition and health coaching! |
Giveaways
In addition to the already awesome package we have here, one lucky reader is going to get the chance to win a Healthy Surprise box! If your family struggles with snacks, this company offers packages of healthy snacks that are delivered to your door once a month. There are three box sizes with different amounts of snacks in them. These snacks are all allergy-free (top 8), grain-free, vegan, and mostly organic. They're appropriate for almost any family!
No purchase necessary to enter.
 |
$75 value “Healthy” Healthy Surprise snack box |
View the FAQ.
Offer Details
- Sale runs 9 AM EST Sept. 17 through 11:59 PM EST Sept. 21
- No late sales
- ALL SALES FINAL
- Buyers may be from anywhere in the world; but books are only in English
- There are no physical/shipped products; the bundle offer is digital only.
- Download links are good for 5 attempts or through 10/31/13, whichever comes first.
- Bundle may not be downloaded and links cannot be re-activated after 10/31/13
- Bundle files may not be shared. Each book may be on only one computer/one residence at once
- Buyers are permitted to share books if they send files they do not want to one other person and delete the files themselves, so only copy of each is in use
- If buyers split the bundle, they only get one set of bonus offers and must share
- Bonus offers must be claimed by 9/30/13
- Bonus offers may not be available in non-U.S. areas
- Bonus offers are made through a third party and we do not have any control over them. Items may be unavailable or sales may end without warning
- By purchasing, you are certifying that you have read and agree to these terms and conditions
12 September 2013
Traditional Recipes Bundle!!!
I've spent far too many nights sitting on my couch, when I've either forgotten to make a meal plan or forgotten to print it out (such a tiny thing that is a huge mistake for me!) wondering...what's for dinner? I start to scour the internet for ideas. I ask you, my lovely readers, what you're having. I check out mainstream recipe sites for new dishes that might contain the ingredients I have. I might even pore over my old cookbooks in the kitchen. Just to find some inspiration. But what if you had hundreds of 100% real food recipes at your finger tips? Recipes that could inspire you for a quick meal...teach you to cook with whatever's on hand...help you make real food frugal...or offer gourmet ideas to plug into your meal plans or special nights? A lot of my readers have said they wished that they had something like this. Next Tuesday, I will have the perfect collection for you: the Traditional Recipes Bundle.
Hundreds of Recipes, At Your Finger Tips
In this collection, you'll find:
- *Lots of allergy-friendly books (half or more are GF/CF)
- *Books to teach you to cook with what you have on hand
- *Meal planning
- *Snacks on the go
- *Freezer cooking
- *Printable recipe cards
- *Health benefits of various foods
- *Healthy desserts
- *Gourmet meals
- *Simple, everyday meals
- *Make-your-own sauces and condiments
- *...and so much more!
What's the Deal?
What's In the Bundle?
Kitchen Help
- Cooking With Coconut Oil by Jennifer Saleem of Hybrid Rasta Mama (68 delicious recipes featuring coconut oil)
- Design a Dish by Millie Copper of Real Food for Less Money (6 basic formulas for creating recipes with what you have)
- Restocking the Pantry by Kresha Faber of Nourishing Joy (57 sauces, condiments, and more)
- Real Food, Real Easy by Angela Montgomery of Real Whole Health (13 frugal, easy recipes)
- Real Food for Real Homemakers by Jami Balmet of Young Wife’s Guide, Jaimie Ramsey of Living In the Light and Elsie Callender of Richly Rooted (78 basic recipes + printables + how-to-anything in the kitchen -- NEW!)
Main Dishes
- 7 Day Real Food Meal Plan by Roxanne King of The Holistic Mama (7 days of a plan, complete with 38 recipes for 3 meals a day, all GF/CF)
- Much Ado About Chicken by Debra Worth of Sweet Kisses and Dirty Dishes (52 delicious allergy-friendly chicken-based meals, GF, NEW!)
- Stretchy Beans by KerryAnn Foster of Intentionally Domestic (13 frugal, bean-based meals, GF/CF, NEW!)
- Divine Dinners by Lydia Joy Shatney of Divine Health From the Inside Out (92 gourmet dinners, sides, soups, and more, GF)
Snacks and Sides
- The Veggie Book by Danielle Tate of More Than Four Walls, Sara Shay of Your Thriving Family and Debra Worth of Sweet Kisses and Dirty Dishes (52 recipes featuring 10 different vegetables, creatively; GF, NEW!)
- Healthy Snacks to Go by Katie Kimball of Kitchen Stewardship (40 classic snack recipes that are travel- and lunch box-friendly)
- Steeped by Katie Stanley of Nourishing Simplicity (56 recipes for tea treats like cakes, scones, sandwiches, tea, and more; GF, NEW!)
- Toadally Primal Smoothies by Primal Toad of Primal Toad (150 unique smoothie recipes, primal/paleo)
Desserts, Baking and Special Occasions
- Festive Traditions by Jill Marks of Modern Alternative Kitchen (32 holiday and special occasion recipes)
- Treat Yourself: Real Food Desserts by Kate Tietje of Modern Alternative Mama (30 delicious, healthy desserts)
- Sourdough Goodness by Anna Drozdova of Thought For Real Food (13 sourdough recipes, NEW!)
- Travel Foods by KerryAnn Foster of Intentionally Domestic (13 recipes that go with you easily, NEW!)
Is There More?
- A coupon code for Real Salt
- A coupon code for Wise Choice Market
- A free premium trial membership to Tradishen
- Simple Natural Health, by Nina of Shalom Mama
- ...and more (we're still talking to a few excellent companies!)
Which book(s) intrigue you the most?
My first e-book!!!
I am so excited!!! I have written my very first e-book!

You know how I am converting all these recipes into sourdough ones, well I had an idea of writing a book about it. My book is all about baking with sourdough starter.
If you are interested in my book you can get it through Amazon, Kobobooks or directly here.
I hope you enjoy it and happy reading!!!!!

You know how I am converting all these recipes into sourdough ones, well I had an idea of writing a book about it. My book is all about baking with sourdough starter.
It all started when I learned about the health benefits of the sourdough or wild yeast and at about the same time I discovered how wheat and other grains, if not prepared properly, can cause serious health problems. The problem was that me and my family really love bread and other baked goods and I did not want to exclude them completely from our diet. So I found a way to have my cake and eat it too, literally. Making all those recipes using sourdough starter allowed my family to keep enjoying our favourite foods and at the same time we could maintain our health. This was so exciting!
I started converting the recipes that used wheat flour into sourdough versions, which came quite naturally and turned out to be easy for me to do. So now whenever I see a new recipe that requires baking with flour I say to myself: 'I bet I can convert this recipe to use the sourdough starter and make it healthier and try to keep it tasty at the same time'.
At some point I collected so many of those recipes that I decided to put them together in a book and I called the book Sourdough Goodness. But then I realised that I had enough recipes for 2 books and so I decided to divide Sourdough Goodness into 2 volumes. I am happy to announce the release of the Volume 1, the second volume is still in the making and unlike the first volume that has only savoury recipes the second volume will have some sweet recipes as well.
The book is quite versatile, it contains recipes from different cuisines: Russian, Jewish, English, Italian, French, Mexican, Middle Eastern, Indian, Jamaican.
If you are interested in my book you can get it through Amazon, Kobobooks or directly here.
I hope you enjoy it and happy reading!!!!!
10 August 2013
Coconut Flour Brownies
This is a very quick and easy recipe. You just mix it up, bake and within an hour you have a healthy and very tasty treat for the whole family. This is amazing how easy this is!

Ingredients:
100g organic preferably raw butter plus some extra for buttering the baking tin
100g organic dark good quality chocolate
4 organic free range medium eggs
170g raw organic honey (or organic rapadura, or organic coconut sugar)
1 tsp organic vanilla extract
1/3 tsp sea salt
50-60g organic coconut flour
Equipment:
mixing bowl
17×26 baking or roasting dish/tin (I use glass)
Directions:
Heat the oven to 180C.
Gently melt chocolate and butter. Beat the eggs in a mixing bowl, add the butter and chocolate mixture (make sure it is cool), vanilla, honey, salt. Mix everything very well. Now mix in the coconut flour, I would advise to put the first 50g and mix very thoroughly, then set the mixture aside for one minute. The coconut flour has loads of fiber and absorbs a lot of moisture, so wait and see your mixture thicken quite a lot. After a minute check the batter and decide if you want to thicken it further.
Pour the brownies batter into the buttered baking dish, brownies will not rise so you can use the smaller dish or make the double batch. Bake for 20-25 minutes. Make sure to cook down before eating it.
And now enjoy!
8 August 2013
Sourdough Pelmeni (Russian Meat Dumplings)
This is a very traditional Russian recipe and does require time to prepare, but once ready it is a very nutritional, healthy, fast and easy to prepare meal. Please read through to make sure you set aside enough time to prepare this recipe.

Ingredients:
For the dough
100 g white active sourdough starter
100 g filtered water
3 organic free range eggs
1 tsp sea salt
500 g organic white all purpose flour
For the meat filling
350 g organic pastured pork mince
350 g organic pastured beef mince (or wild venison mince if available)
50 g organic pastured chicken liver
50 g organic pastured lard or beef tallow or butter
1 small organic onion
2 medium cloves of organic garlic
salt and pepper to taste
Equipment:
mixing bowl
cling film
rolling pin
Russian pelmeni maker (they sell it on ebay)
Instructions:
Mix all the ingredients for the dough and knead it very well for around 10 minutes. The dough should be quite stiff. Place the dough in a slightly floured bowl and cover with cling film. Leave the dough at room temperature for at least 8 hours or overnight.
After 8 hours or in the morning prepare the meat filling by blending together all the liver, fat, onion, garlic and spices. Add this mixture into the pork and beef (venison) mince and mix it thoroughly with your hands if possible, beat it by lifting the meat mixture and slamming it back in the mixing bowl, do that for at least 5 minutes. The fat and liver in the mixture makes the filling soft and fluffy, and the beating makes it bind together better. After you done, cover the bowl with the meat with cling film and let it 'rest' for 10 minutes.
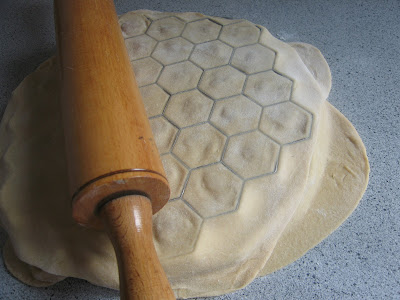
In the meantime take the dough, nip off a small fist-size ball and roll it out very thinly on a lightly floured surface, leave the rest of the dough covered with cling film. Take the pelmeni maker and sprinkle it with some flour so the dough doesn't stick to it,

place the rolled out dough on top of the pelmeni maker.

Now you need to fill every opening with the meat mixture that you prepared earlier. Take two tea spoons and scoop the meat with one, there should be about 1/2 of the tsp of meat or slightly more, do not be tempted to take more meat as the finished product might burst, manipulating the piece of meat with two tea spoons scoop it out into first opening. Proceed filling in every opening of the pelmeni maker.

Do it as evenly as you can, some balls of meat will be bigger some smaller, that is ok.
Next cut another fist-size ball from the dough, roll it out thinly and place it over the meat.

Take the rolling pin and very gently bash on the top layer of dough so that the meat balls sink inside and then roll it on top to separate the pelmeni.
Remove the extra dough from around,

pick up the pelmeni maker by the edge, turn it upside down and bash its side on the table so that the pelmeni fall out

be careful not to squash already fallen out pelmeni. Now for easier storage you need to freeze them. The best way to do it is by placing ready pelmeni on the slightly floured flat surface, I use plastic leads,

cover them with some cling film and transfer to the fridge for a few hours or until the pelmeni are frozen hard, then you can transfer them all into a large plastic zip bag and place into the freezer for the storage.
Keep doing the same using all the dough and all the meat.
At the very end when you have a small mount of both meat and dough I would advise you to finish off without the pelmeni maker. Here is how. Roll out the remaining dough thinly, take a narrow glass about 6-7cm in diameter and use it to cut the circle of dough,

then place the same ball of meat as above in the middle of the circle, take the circle in your hand bring the edges of the dough together to form a semi-circle and pinch the edges with your fingers, then bring the opposite ends together and form a round pelmen by pinching the ends together firmly.

You can actually make the whole batch like that manually if you decide to be really traditional about it.
In case you have some leftovers of meat and no more dough you can form meat balls and freeze them. If you have leftovers of dough you can roll it out very thinly, cut out long strips with a pizza cutter and you have tagliatelle pasta.
As soon as you make the pelmeni you can cook them straight away. You need to boil some water in a pot, adding 2-3 peppercorns, 1 bay leaf and some sea salt.

When the water is boiling throw in the amount of pelmeni you intend to eat, do not cover with the lid. Fresh pelmeni need 1-2 minutes to cook in the boiling water, they will be floating on the surface. When ready fish the pelmeni out with a skimmer, place them in a bowl and eat straight away. But if you really want to be Russian about it, add some sour cream (you can make your own, here is the recipe), a tea spoon of horseradish sauce and some of the liquid, mix everything together and eat as a soup.
The frozen pelmeni can be eated the same way, you do not need to thaw them, just boil the water and put the frozen pelmeni straight in, they will take 2-3 minutes in the boiling water to be cooked.
Pelmeni keep in the freezer for a few months and are really tasty and nourishing alternative to fast food or whenever you have no time for cooking.

Ingredients:
For the dough
100 g white active sourdough starter
100 g filtered water
3 organic free range eggs
1 tsp sea salt
500 g organic white all purpose flour
For the meat filling
350 g organic pastured pork mince
350 g organic pastured beef mince (or wild venison mince if available)
50 g organic pastured chicken liver
50 g organic pastured lard or beef tallow or butter
1 small organic onion
2 medium cloves of organic garlic
salt and pepper to taste
Equipment:
mixing bowl
cling film
rolling pin
Russian pelmeni maker (they sell it on ebay)
Instructions:
Mix all the ingredients for the dough and knead it very well for around 10 minutes. The dough should be quite stiff. Place the dough in a slightly floured bowl and cover with cling film. Leave the dough at room temperature for at least 8 hours or overnight.
After 8 hours or in the morning prepare the meat filling by blending together all the liver, fat, onion, garlic and spices. Add this mixture into the pork and beef (venison) mince and mix it thoroughly with your hands if possible, beat it by lifting the meat mixture and slamming it back in the mixing bowl, do that for at least 5 minutes. The fat and liver in the mixture makes the filling soft and fluffy, and the beating makes it bind together better. After you done, cover the bowl with the meat with cling film and let it 'rest' for 10 minutes.
In the meantime take the dough, nip off a small fist-size ball and roll it out very thinly on a lightly floured surface, leave the rest of the dough covered with cling film. Take the pelmeni maker and sprinkle it with some flour so the dough doesn't stick to it,

place the rolled out dough on top of the pelmeni maker.

Now you need to fill every opening with the meat mixture that you prepared earlier. Take two tea spoons and scoop the meat with one, there should be about 1/2 of the tsp of meat or slightly more, do not be tempted to take more meat as the finished product might burst, manipulating the piece of meat with two tea spoons scoop it out into first opening. Proceed filling in every opening of the pelmeni maker.

Do it as evenly as you can, some balls of meat will be bigger some smaller, that is ok.
Next cut another fist-size ball from the dough, roll it out thinly and place it over the meat.

Take the rolling pin and very gently bash on the top layer of dough so that the meat balls sink inside and then roll it on top to separate the pelmeni.

Remove the extra dough from around,

pick up the pelmeni maker by the edge, turn it upside down and bash its side on the table so that the pelmeni fall out

be careful not to squash already fallen out pelmeni. Now for easier storage you need to freeze them. The best way to do it is by placing ready pelmeni on the slightly floured flat surface, I use plastic leads,

cover them with some cling film and transfer to the fridge for a few hours or until the pelmeni are frozen hard, then you can transfer them all into a large plastic zip bag and place into the freezer for the storage.
Keep doing the same using all the dough and all the meat.
At the very end when you have a small mount of both meat and dough I would advise you to finish off without the pelmeni maker. Here is how. Roll out the remaining dough thinly, take a narrow glass about 6-7cm in diameter and use it to cut the circle of dough,

then place the same ball of meat as above in the middle of the circle, take the circle in your hand bring the edges of the dough together to form a semi-circle and pinch the edges with your fingers, then bring the opposite ends together and form a round pelmen by pinching the ends together firmly.

You can actually make the whole batch like that manually if you decide to be really traditional about it.
In case you have some leftovers of meat and no more dough you can form meat balls and freeze them. If you have leftovers of dough you can roll it out very thinly, cut out long strips with a pizza cutter and you have tagliatelle pasta.
As soon as you make the pelmeni you can cook them straight away. You need to boil some water in a pot, adding 2-3 peppercorns, 1 bay leaf and some sea salt.

When the water is boiling throw in the amount of pelmeni you intend to eat, do not cover with the lid. Fresh pelmeni need 1-2 minutes to cook in the boiling water, they will be floating on the surface. When ready fish the pelmeni out with a skimmer, place them in a bowl and eat straight away. But if you really want to be Russian about it, add some sour cream (you can make your own, here is the recipe), a tea spoon of horseradish sauce and some of the liquid, mix everything together and eat as a soup.
The frozen pelmeni can be eated the same way, you do not need to thaw them, just boil the water and put the frozen pelmeni straight in, they will take 2-3 minutes in the boiling water to be cooked.
Pelmeni keep in the freezer for a few months and are really tasty and nourishing alternative to fast food or whenever you have no time for cooking.
4 August 2013
Traditional Russian Sour Cream (Super Easy and Cheap Recipe)
This is possibly the shortest and certainly one of the easiest recipes out there. This is due to it being very traditional and based on wild fermentation, meaning your involvement in the process is almost zero and all the work is done by the amazing creatures that are everywhere in the air - wonderful bacteria.
I now there are recipes that call for culture to be added to get the souring process started, but I tend to keep my cooking simple, cheap and follow the tradition where possible. The method I describe below is based on Russian tradition that was and still is used in villages to make sour cream.
Ingredients:
organic raw grass-fed cream, the thicker the better
The amount really depends on your needs and here in London on your finances.
Equipment:
glass jar if your cream comes in plastic container
Leave the glass jar with the cream on the kitchen counter for 1 - 3 days covered with the lid but not tight, just place the lid on the jar and do not screw it closed. The amount of days solely depends on the temperature in your kitchen. During summer it will be 1-2 days, during winter around 3. Really what should be your guide is your taste buds. The taste of the finished product should be sour but not overpoweringly so, and just a tad sweet.
That is it, there you have your sour cream.
If you ask me where to use this wonderful product, well I would say almost anywhere: in borstch (traditional Russian and Ukrainian soup), on sautéed cabbage with mince (lazy Russian Golubtsy or Cabbage Rolls), in all the cream soups, in vegetable soups, on Russian Golubtsy (Cabbage Rolls), with Russian Pelmeni, on sautéed vegetables, on stuffed sweet peppers, on freshly boiled new potatoes with dill, mixed up with cream cheese and some honey or other sweetener of your choice (as a dessert), it can be just eaten on its own out of the jar, or with some honey if you like it sweet.
Yes, you are right again, I am Russian and I tend to use sour cream with almost everything :). Love the stuff!
Hey, happy cream souring to you and please do get back here and share your experience or just comment your thoughts.
28 July 2013
Sourdough Pizza

I have adopted this recipe from Jamie Oliver's book 'Jamie's Italy'. I love this book and love Jamie, he's got so many delicious recipes, so here goes:
Makes: 4 large (or 6 medium) pizzas
Crust:
300 g white organic stone ground strong flour
150 g white sourdough starter (same as here but made with white organic all purpose flour)
1 tbsp raw organic honey
1 tsp with a hip unrefined sea salt
150 g lukewarm filtered water and grass-fed organic raw milk (50 / 50)
Toppings (all ingredients organic):
1) Salami, courgette, basil, tomato and mozzarella, black pepper and sea salt
2) fried up unsmoked streaky bacon, sauteed onion, mozzarella, sweet pepper, tomatoes, black pepper and sea salt
3) garlic, parsley, black pepper and sea salt (''garlic bread'')
4) kids' pizzas with organic no-poo or home-made ketchup (my son doesn't like the tomato sauce), grass-fed pork chipolata sausages or any other organic sausages of your kids' liking, sweet peppers, sea salt
or any topping of your liking
Basic Tomato Sauce:
2 midium organic tomatoes
1 clove organic garlic
bunch organic basil leaves (trimmed)
grass-fed organic raw butter
sea salt and black pepper
First you need to make the crust. Bring all the ingredients together for the crust and knead for about 10 minutes by hand. Place the dough into the slightly floured dusted bowl and cover with cling film. Leave to ferment overnight or at least for 8 hours.
In the morning, the next day, knead the dough for about 1-2 minutes, cover in a bowl and leave for 2-3 hours to proof.
About half an hour before you want to bake your pizzas heat the oven with the baking stone inside to 250⁰C. I use my baking stone, but you can use any baking tray.
At the same time start preparing your toppings and tomato sauce. For tomato sauce you need to heat the frying pan with some butter, slightly fry chopped garlic for a bout 1 minute, then add some chopped basil leaves and add tomatoes (to remove the skins simply grate the tomato on the carrot grater), season with black pepper and sea salt. Simmer this for 15 minutes on the medium heat to reduce some of the water from tomatoes.
While the tomato sauce is simmering you can prepare your toppings for quick and easy application. All the quantities are up to your taste. Chop thinly courgettes, tomatoes, fry up streaky bacon with salt and pepper, cut and fry chipolata sausages, cut a small onion into thin rings and saute in some butter with a bit of sea salt and a bit of brown sugar or rapadura until caramelised, finely cut up sweet peppers into long strings, cut up mozzarella or tear it into chunks, wash some basil leaves and parsley, grind some sea salt and black pepper. I usually place each ingredient into a separate little bowl for convenience.
Now you are ready to actually make pizzas. Take your dough and divide it into 4 (or 6) pieces, set aside 3 (5) of them and roll one thinly (1-2 mm) on lightly dusted surface into almost round shape and place it on the parchment paper (in order to easily transfer it to the baking stone I place the parchment paper onto a cutting board). Apply the tomato sauce, toppings and bake for 10 - 15 minutes depending on your oven until golden and crispy.
19 July 2013
Sourdough Molasses Cinnamon Rolls

Ingredients:
For the dough:
50 g white active sourdough starter
40 g organic unsulphured molasses
1/3 tsp unrefined sea salt
100 g organic pasteured grass-fed milk
70 g organic grass-fed butter
360 g organic white all purpose flour
For the filling:
4 tbsp organic cinnamon
50 g organic coconut sugar (date sugar, succanat or honey)
1 tbsp organic raw honey
40 g organic grass-fed butter
Instructions:
For the dough, gently combine butter, milk and molasses in a saucepan over low heat until well-blended and heated to blood temperature. Mix this together with the rest of the ingredients and knead well for 10 minutes until the dough is soft and elastic. Cover with a cling film in a bowl and leave to rise and ferment for minimum of 8 hours or overnight.
When ready to make the rolls heat the oven to 180 C and roll out the dough to about 1 cm thickness. Prepare the filling by gently melting the butter combined with cinnamon, sugar and honey. Spread the filling as evenly as possible over the rolled out dough. At this point you can sprinkle with any variations of raising, cranberries, other dried fruits and nuts. I didn't as I am not a big fan of those in the baked goods.
Now you need to gently roll the dough to form a tube. Cut the tube with a very sharp knife or a special string into 2 cm pieces and place them onto the cookie sheet lined with unbleached parchment paper.
Bake until golden brown. It took me around 30 minutes but this will largely depends on your oven. Cool them down a bit and have them with tea, coffee, milk or on their own. They keep best in an airtight container at room temperature. Or you can freeze some in the zip bag and defrost them in the oven later.
Enjoy!
5 July 2013
Sourdough Vanilla Pretzels Russian Style - Sushki

Ingredients:
70 g active white sourdough starter
80 g raw honey
1 egg
50 ml raw milk
50 g butter (melted)
1,5 tsp vanilla extract
325 g white all purpose organic flour
½ tsp sea salt
Equipment:
Mixing bowl
Plastic Wrap
Baking sheet and parchment baking paper
Medium pot for boiling
Water, preferably filtered
Big plate and kitchen towels or tea towel
dough cutter/bench scraper or chef’s knife
skimmer or large spoon with holes
Instructions:
Mix everything together to form soft dough, knead it for 5
minutes. Leave it in a bowl covered with cling film overnight or at least for 8
hours to ferment.
Next day the dough will be slightly oily and soft. Divide the
dough into 6 parts, leave 5 aside covered with cling film and roll 1 part of the
dough between your hands into a sausage approximately 3 cm thick. Then using
chef’s knife or dough cutter/bench scraper cut the sausage into small parts ½
cm thick.
Without using additional flour roll each small piece between
your hands or on the kitchen surface with one hand to form a long and thin
rope, pick it up and connect two ends to form a ring and roll them together a
little bit between your fingers so they
stick together and do not come apart. Leave the ring aside on the kitchen
counter. Repeat the same with all the ropes.
Somewhere half way through the rolling process fill half a
medium pan with preferably filtered water and bring the water to boil. At the
same time heat the oven to 200 °C.
Putting around 10 at a time, boil the rings in the water for
30 seconds, they need to float to the surface of the water. Fish them out with
skimmer or large spoon with holes. Place the boiled rings onto a large plate
lined with a kitchen towel or a tea towel to absorb the water from the rings.
After you done, throw another batch of rings
into boiling water. While they are boiling, place the drained rings onto the
baking parchment lined baking sheet, place the rings half a cm apart as they
will slightly expand and stick together if placed too close to each other. Fish
out the next batch of rings onto the plate to drain and throw the next,
continue till all done.
When the baking sheet is full place into the heated
oven and bake for around 15 min checking every 7 minutes or so and turning the
sheet if necessary. The rings should be golden brown, but do not worry if you
burn a few they are still really tasty.
While the rings are in the oven, make more rings from the
next piece of dough and continue until all done.
They are really good on their own or dipping into jam and
washing with raw organic milk.
Subscribe to:
Comments (Atom)